
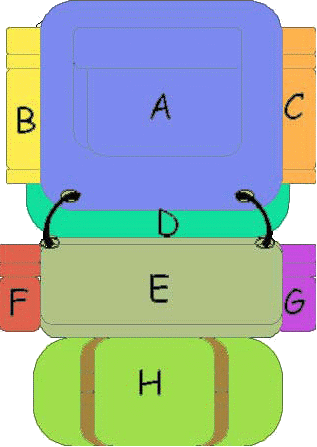
Suggestions As To What To Pack And Where To Pack It
This check list is offered as a near minimum for a safe and comfortable backpack outing. Using an adequate pack and sleeping bag the weight should be under 20 lbs. You will need to add 1 1/2 to 2 lbs. per man per day for dehydrated food and 2 lbs. per quart of water. You should be able to pack in for a week carrying under 30 lbs.
When buying ANYTHING for camping or backpacking, wait until you can afford quality equipment, buying something “for now” will only cost you allot more in the long run. Don’t buy just for camping if you ever plan on backpacking, camping equipment is no good on a backpack trip, but backpacking equipment is perfectly fine for a camp out.
The lighter the equipment and the less room it takes up, the more it will cost. However, the quality usually is much, much better and you can have it a lifetime if taken care of properly.
NOTE: This list is not intended to be considered the best or only way to pack a bag. As you gain experience you can shift around to suit your own idea.
|
 |
CARRY ON YOUR PERSON: Compass, pocket knife, Medic Alert bracelet or pendant (if used), waterproof matches.
PACK ITEMS IN SMALL STUFF BAGS: For easy access to your gear, pack all your gear in small stuff bags then pack the backpack. Plastic zip lock bags make excellent small and medium stuff bags especially to keep items dry. Large zip lock bags can be used to pack clothing.
Zone Method Of Packing A Backpack
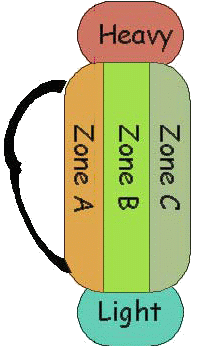
The Zone Method of packing a backpack can make the difference between drudgery and enjoyment during the time spent on the trail.
A few simple principles which are often overlooked can make a difference. Technically speaking the body has a center of gravity located directly over the ankles. When standing normally there is very little forward of the body. However, when a pack is placed on the back, the body leans forward to bring the pack’s center of gravity directly over the ankles. Consequently, it is advantageous to keep the pack’s center of gravity as close to your back as possible to prevent unnecessary forward lean. As a result the following method is recommended to load a backpack.
ZONE A: This area is the closest to the back and should carry equipment of the greatest density like stoves, tent hardware, water, etc
ZONE B: This middle area should be packed with medium density objects.
ZONE C: The area farthest away from the body’s center of gravity should be filled with the lightest equipment.
HEAVY – HIGHER and LIGHT LOWER
There is also a benefit in placing the densest weight high in the pack as it will be more directly over the center of gravity. A tent should be either distributed in Zone A of the pack or strapped on top. The sleeping bag can be stuffed in the bottom toward Zone C or strapped to the bottom of the pack.

Wilderness Backpacking Suggestions
EQUIPMENT
Do not be hasty in buying equipment. Talk to experienced backpackers. Try out several packs. Before buying equipment ask yourself:
- Is it light weight and low in bulk?
- Will it be durable?
- Will I use it?
Do not make low cost your only criterion. There is no compromise for quality. There are no stores in the wilderness!
SURVIVAL
Carry a small survival kit. It could save your life. Leave a trip schedule, preferably in writing with a responsible person, giving the following information:
- Who is going where
- When you expect to return
- The type of vehicle you will use
- Location of the trail head and route to be taken
- If you’re going deep into the back country, out to sea or on any remote trip consider taking a Personal Locator Beacon (PLB)
Above all, do not decide to stay an extra day. Search parties cost money and time.
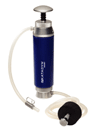
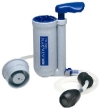
Water purification: As a minimum boil water or add 1 iodine tablet per instructions on tablet bottle. Let stand for 30 minutes or as directed on the bottle. For cloudy water, double the purifier.
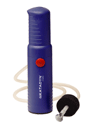
Really you should carry a water purifier like a those offered from Katadyn
 |
 |
 |
|
Katadyn Pocket Water Purifier
|
Katadyn Pro Hiker Water Purifier
|
Katadyn Combi Water Purifier
|

Be aware of the safety water drinking guide that filters are rated on.
ECOLOGY (Low Impact Camping)
Be aware of the safety water drinking guide that filter are rated on.
CAMPING
By using dehydrated foods you add under two pounds per man per day. Water weighs two pounds per quart. Wherever possible carry your own stove and fuel. Leave vegetation for the next party to enjoy. Camp away from the only source of water. The animals will not be able to drink as long as you are camped there.
Getting Into A Heavy Load Most backpackers develop a method of putting on a pack. However, the following are a few recommendations which have proven to be easy and safe for both pack and packer. Before following the suggestions outlined, start with a realistic weight, by loading the pack as if you were going on a hike.
- Stand by the frame with the load side turned away. If you are right handed, point your right foot toward the frame.
- Stepping backward with the left foot and crouching slightly to slant the right thigh, drag or lift the frame to rest on the thigh.
- Steadying the frame with the left hand, and holding the upper part of the right shoulder strap, put the right arm under the shoulder strap. Reach downward with the right hand to grasp the lower right corner of the frame. Twist the upper body to the right and pull the right shoulder strap in place. Lifting the frame with your right hand, swing your elbow back to slide the frame around on your back. While the frame is held high and far to the left, put the left arm through the shoulder strap and pull the strap into place.
- Buckle the hip belt in place and adjust the shoulder straps to hold the frame high on your back. Tighten the hip belt to relieve the pressure on the shoulder straps.
- To remove the pack, reverse the procedure described and shown in the animated diagram. Just remember never let the loaded frame drop on one leg as damage may occur. With practice a loaded frame can be put on or taken off with ease and without injury or damage to the packer or the frame.
The Importance Of A Properly Fitted Backpack
A properly fitted, well made backpack is extremely important. For new Scouts, an external frame pack that is sized to fit your son is recommended. Important elements to look for in a good external pack are:
- A good pack frame will have welded construction Well padded hip belt that will tighten snugly just above his hips. The belt should be tight enough to support the pack on the belt when loaded with 25 to 30 lbs.
- The hip belt supports the weight, not the shoulder straps. Well padded shoulder pads.
- The shoulder straps should be attached to the frame high enough above the shoulder that the straps come down from the frame to the front of the shoulder. The straps should not be resting on the top of the shoulder. The straps are designed to hold the pack against the back, not carry the load.
- Good quality sleeping bag and tent straps should also be bought to securely fasten the bag and tent to the pack. Straps should be a minimum of 1″ wide with a sturdy buckle system.
- Bungee or elastic cords should not be used to fasten items to the exterior of the pack because these allow the load to shift and bounce around.
NOTE: When a backpack is fully loaded with all necessary gear and equipment it should not weigh more than 20% to 25% of the total body weight of the person who is carrying the pack.
- An overloaded, too heavy pack will lead to quick fatigue, possible physical injury, and for certain an unpleasant backpacking experience.
- Recommended brands for new smaller scouts include:
- CAMP TRAILS – ADJUSTABLE II MED. for larger new scouts
- CAMP TRAILS – SKIPPER for small scouts
- CAMP TRAILS – SMALL OR MED. for most new scouts
- PEAK I PLASTIC FRAME PACK several models to choose from
- KELTY TREKKER 64 or YUKON YOUTH PACK – belt adjusts down to 22″
- SUGGESTION: Buy a pack that fits now and sell it to a smaller scout when your son outgrows it. Packs will not loose their value if cared for properly.
Other Suggestions For Backpacking Equipment
SLEEPING BAG
A good sleeping bag is a great investment which will last for many years. A mummy style bag is recommended since it is lighter weight and the warmest. The insulation in the bag should be synthetic Hollofil or Quallofil. Down is warmer and lighter, however, it looses all of its effectiveness when it gets wet. This is not the case with the synthetic insulation. Down filled sleeping bags loose up to 90% of their thermal properties were a Synthetic filled sleeping bag retains up to 85% of its thermal properties.
A good bag will be made with offset or slant layer construction which will not be sewn all the way through the inner and outer covering. Recommended bag weight for backpacking is about 4 lbs. or less and the bag should be rated for 20 degrees or less for this region depending on the time of the year.
Be careful choosing the weight, size packed, and fill of the bag. Also the rated degrees is VERY important, you can supplement bags with extra blankets on camp outs or double up the bags when it gets real cold. I own a 40° and a 0° bag.
SLEEPING PAD
A closed cell foam sleeping pad is a must for winter camping, since it insulates you from the cold earth. Also the sleeping pad provides some padding against the hard ground. Pads come in ¾ length and full length, 3/8″ and ½” thickness. Pads come in smooth and ridge constructions.
Also available are self-inflating sleeping pads of various styles and depths. These pads weigh more than a foam pad and are not recommended for new scouts who need to conserve weight.
The best I’ve found is a Therm-a-Rest ProLite 4 Sleeping Pad™. It is a 4 season sleeping pad that weighs only 1 Lb. 6 Oz. and packs up to a compressed size of 4.8 X 11 Inches. It is a self inflating pad that is 1.5 inches and has an insulting factor (R-Factor) of 3.2. The ProLite 3 is 1 inch and has an R-Factor of 2.5 but only weighs a couple of oz’s. less.
TENT
The tent you select should ideally be a backpacking style weighing approximately 4 lbs. or less. It should be fitted with a rain fly which comes almost to the ground, otherwise rain can blow under the fly. Free standing tents work best for the new scouts since they can be easily moved after set up and they can be cleaned out by lifting up and shaking them out. Tents without a lot of guy ropes to trip over are preferred.
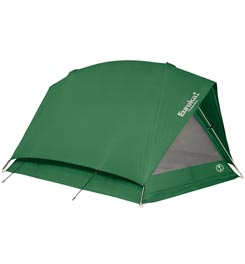
I personally like the Eureka Timberline series tents. These are not the lightest tents for backpacking, however they are very durable, all, around free standing tent that will last many years if taken care of. I am still using my 2 man Timberline tent from 25 plus years ago when I was a scout.
You could take it even one step further. If you know for sure you’ll be in the woods while sleeping…and it’s warm…Skip the sleeping pad, and tent.
 Use a hammock! An option is the Hennessy Hammock™ Scout Model, and it only weighs 2 lbs 10 oz., has a rain fly and has a 1 oz. 20D polyester NoSeeUm netting. Light, Waterproof, and Bugproof, what more could you ask !
RAIN GEAR
Good rain gear is important. The weather can change in a matter of minutes. Being wet is most uncomfortable. Do not cut corners. Ponchos provide quick access to rain gear. A coated nylon style, properly sized for the wearer to maximize protection without dragging the ground will last for many years. Rain suits are more expensive, provide better protection but cannot be worn as many years.
- I use two Outdoor Products™ Regular Multi-Use Backpacking Ponchos
- Lightweight and durable
- Rustproof snaps
- Full cut hood & drawstring closure
- Water-resistant urethane coated nylon taffeta
- Resealable polybag package
The first poncho I use normally as a poncho so I can get out of my Bivy or hammock dry. In addition, I could use the second poncho to build a survival shelter if needed or as a pack cover.
BOOTS AND SOCKS
Boots and socks that are made for hiking are important. Boots should be ankle height to give support to the ankle. They can be made of leather or a combination of leather and heavy cordura cloth. Leather boots treated with a sealant like “Snow Seal” will be some what water proof, yet allow the boot to breathe. The cordura boots are lighter in weight but are not waterproof unless you choose a pair with Gor-Tex, which greatly increases the price.
Hiking boots should always be worn with sock liners (polypropylene or silk) and wool hiking socks. The liner socks will stick to the heel and foot. The wool sock will stick to the boot. The friction of the foot moving inside the boot will occur between the two pair of socks not between layers of the skin, which causes blisters.
Make sure that you wear hiking sock liners and wool hiking socks when you go to try boots on in the store. Before wearing boots on a hike the boots should be worn around the house for several days to break them in properly.